
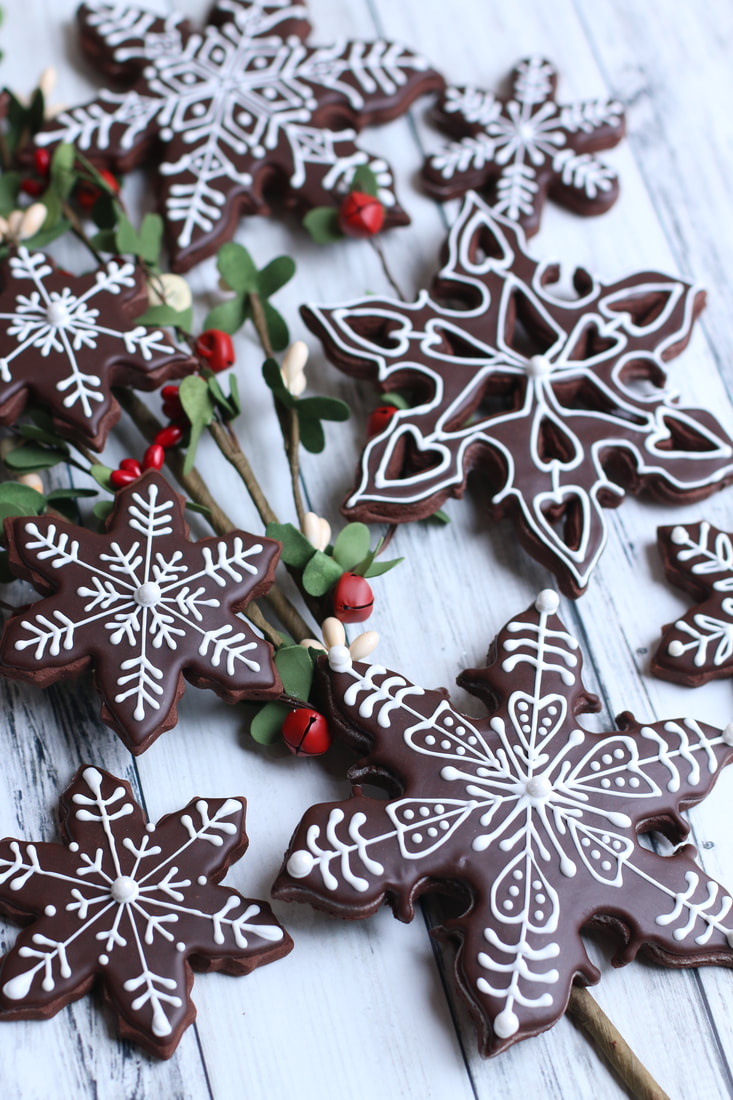
 Chocolate Brownie Snowflake Cookies I’m obsessed with these Chocolate Brownie Snowflake Cookies! Perfect for Christmas celebrations, sleighride parties, and all the winter holidays, they are rich in chocolate flavor, incredibly soft and chewy, and almost too cute to eat! Paired with fudgy Chocolate Royal Icing and decorated with delicate Vanilla Royal Icing snowflakes and sparkling sugar snow, these sweet cookies send the perfect message of winter fun! Throw in a Holiday Rodelle Giveaway and you'll have visions of sparkling snowflakes dancing in your head!  Chocolate Brownie Snowflake Cookies SNOWFLAKES & COFFEECAKES |
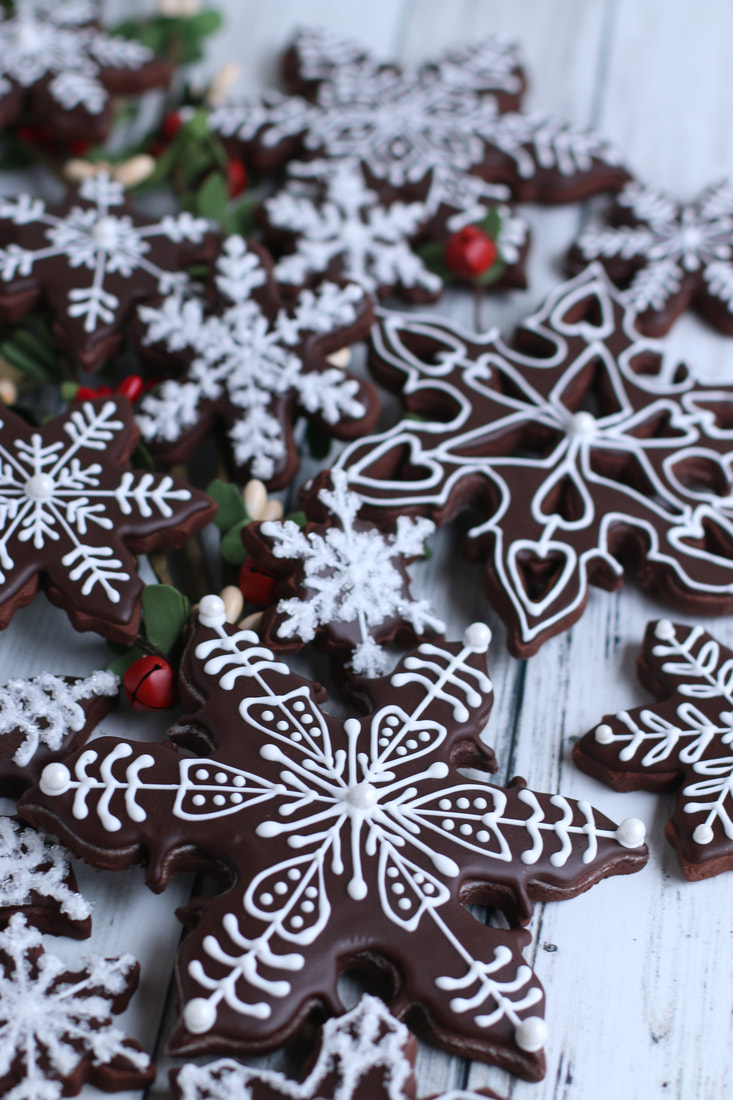
CHOCOLATE BROWNIE SNOWFLAKE COOKIESChocolate Brownie Snowflake Cookies are perfect for all the winter holidays! Rich in chocolate flavor, incredibly soft and chewy, and almost too cute to eat! Paired with fudgy Chocolate Royal Icing and decorated with delicate Vanilla Royal Icing snowflakes and sparkling sugar snow, these sweet cookies sent the perfect message of winter fun!
|
Chocolate Brownie Snowflake Cookies
|
CHOCOLATE CREAM CHEESE SUGAR COOKIES:
2-1/4 cups (270g) all-purpose flour
3/4 cup (63g) Dutch processed Baking Cocoa
2 tablespoons cornstarch
1 teaspoon baking powder
1 teaspoon salt
3/4 cup (172g) unsalted butter (softened to room temperature)
4 ounces cream cheese (room temperature)
1 cup (200g) granulated sugar
1 large egg (room temperature)
1 Tablespoon pure vanilla extract
1 Tablespoon Baker's Extract (chocolate,caramel, cream and oak flavors)
CHOCOLATE ROYAL ICING:
4 cups powdered sugar
¼ cup Dutch processed Baking Cocoa
¼ cup Meringue Powder
1 Tablespoon pure vanilla extract
1 Tablespoon pure chocolate extract
1 teaspoon corn syrup
10-12 tablespoons water (room temperature)
EASY ROYAL ICING:
4 cups powdered sugar
3 Tablespoons meringue powder
1 Tablespoon corn syrup
2 Tablespoons pure vanilla extract
1/2 teaspoon pure almond extract
8-10+ Tablespoons water (room temperature)
AmeriColor Bright White Soft Gel Food Coloring (strongly recommended!)
FOR DECORATING: Easy Royal Icing, Holiday Sprinkles and Sparkling Sugar (all optional)
SPECIAL EQUIPMENT:
- Snowflake Cookie cutter(s)
- Rolling pin (wooden Joseph Joseph Rolling Pin works the BEST for these cookies!)
- Large baking sheets
- Silicone Baking Mats or Parchment Paper
- Piping Bags & Tips
HOW I MAKE THESE:
- Set butter, cream cheese and egg out to warm to room temperature.
- Sift the flour and cocoa powder together in a medium bowl, whisk in the cornstarch, baking powder and salt; set aside.
- In a large bowl using a hand-held mixer or stand mixer fitted with a paddle attachment, beat the butter on medium speed until completely smooth and creamy (about 2 minutes). Add the sugar and beat on medium high speed until light and fluffy, about 2 minutes. Add in the egg, vanilla extract and baker's extract and beat on high speed for another minute. Scrape down the sides and bottom of the bowl as needed between additions.
- On low speed, slowly mix half of the flour mixture into the wet ingredients just until combined; add remaining flour mixture and again mix just until combined. This cookie dough will be really soft and creamy!
- Cut two pieces of parchment paper that will fit your baking sheets.
- Divide the dough into two equal parts. Generously sprinkle your parchment paper and rolling pin with either flour or cocoa powder. Place one piece of cookie dough on top of a parchment paper. Roll each half to a ¼-inch thickness (you will need to re-flour or re-cocoa powder your rolling pin periodically to keep the dough from sticking). The rolled-out dough can be any shape, as long as it is evenly 1/4-inch thick. We’re rolling the cookie dough out BEFORE chilling it, which isn’t typical for most sugar cookie recipes – but this is a great trick! The dough is so much easier to roll out before it’s chilled.
- Stack the pieces, with parchment paper between the two and a single piece of parchment paper on top, onto a baking sheet and refrigerate for at least 2 hours and up to overnight. Chilling is mandatory for this cookie dough, so that the cookies will keep their shape when baked.
- The next day, preheat oven to 350°. Line 2-3 large baking pans with parchment paper (I prefer parchment paper over silicone baking mats for these cookies).
- Remove one of the chilled cookie dough pieces from the refrigerator. The dough will seem very hard, but it’s softer than it appears! Immediately cut into shapes with cookie cutters that have been dipped in flour or cocoa powder. Place each cookie about 2 inches apart on prepared baking sheets. Re-roll dough scraps until all the dough is shaped. Repeat with remaining cookie dough. Refrigerate cut cookie dough on baking sheets for 10-15 minutes before baking (this will help keep them from spreading). HELPFUL HINT: I usually place one completed pan in the refrigerator while working on cutting out the next pan, rotating between cutting, chilling and baking.
- For 3-inch cookies, bake for 10 minutes – the cookies will still appear soft. Make sure you rotate the baking sheet halfway through bake time. If your cookie cutters are smaller than 3 inches, bake for about 9-10 minutes. If your cookie cutters are larger than 3 inches, bake for about 12-13 minutes. Every oven is a little bit different, so watch your first batch when baking and time accordingly. DO NOT OVERBAKE! The cookies don’t spread much when they’re baking, so they will stay around ¼-inch thick. These are thick sugar cookies! Be sure not to overbake these as they’ll lose their softness.
- Allow cookies to cool on the baking sheet for 5 minutes. Transfer the parchment paper together with the cookies to a cooling rack to cool completely. Once completely cool, decorate with Royal Icing.
- Allow cookies to cool on the baking sheet for 5 minutes. Transfer the parchment paper together with the cookies to a cooling rack to cool completely. Once completely cool, decorate with Chocolate Royal Icing, Royal Icing, or Bakery Frosting. Let the magic flow with sparkling sugar and sprinkles! (You may find that Royal Icing in squeeze bottles is easier for little ones to decorate with…)
- TO MAKE CHOCOLATE ROYAL FROSTING: In the bowl of a stand mixer fitted with a paddle attachment, whisk together the powdered sugar, cocoa powder, meringue powder before adding the liquid. Add 7-8 tablespoons of room-temperature water, corn syrup, chocolate extract and vanilla extract, and beat on high speed for 5 minutes until the icing is light and fluffy like meringue. (I always start with 7 to 8 tablespoons of water and usually need to add a tablespoon or two more, depending on the weather and humidity.)
- After five minutes of beating, lift the paddle up off the icing - the icing should drizzle down in a ribbon and smooth out within 10-15 seconds with the frosting in the bowl. If it's too thick, add a little more water (a teaspoon at a time). If it's too thin, add a little more sifted confectioners' sugar (a tablespoon or two at a time).
- If you haven’t made royal icing before, you maybe not be familiar that this icing crusts VERY quickly! When exposed to air icing forms a crust on the surface within 5-10 minutes. To prevent this from happening, you need to cover royal icing when you’re not working directly with it - for the short term you can cover the bowl with a damp kitchen towel or damp paper towel.
- TO MAKE EASY ROYAL FROSTING: In the bowl of a stand mixer fitted with a paddle attachment, add the ½ cup room-temperature water, vanilla extract, almond extract and meringue powder and dissolve on low (do not use a whisk attachment) for a minute or two. Once dissolved and slightly frothy, add all the powdered sugar and begin to mix on low. Add the karo syrup as it all starts to come together. Turn your mixer up to medium-high speed and beat for 5 minutes or until stiff peaks form. BE SURE NOT TO OVERMIX! Once still peaks form, it’s enough. If you overmix, the icing can become crumbly after it dries on your cookies.
- After five minutes of beating, lift the paddle up off the icing - the icing should drizzle down in a ribbon and smooth out within 10-15 seconds with the frosting in the bowl. If it's too thick, add a little more water (a teaspoon at a time). If it's too thin, add a little more sifted confectioners' sugar (a tablespoon or two at a time).
- At this point, you will use the Royal Icing as a base – divide as appropriate and add additional water a little bit at a time so that you have the right consistency for outlining, detail and flooding. For best pure-white results, add AmeriColor Bright White gel food coloring. If you haven’t made royal icing before, you maybe not be familiar that this icing crusts VERY quickly! When exposed to air icing forms a crust on the surface within 5-10 minutes. To prevent this from happening, you need to cover royal icing when you’re not working directly with it - for the short term you can cover the bowl with a damp kitchen towel or damp paper towel.
- FROST & DECORATE! Pipe or frost completely cooled cookies and sprinkle with optional royal icing flowers, sprinkles or decorating sugar.
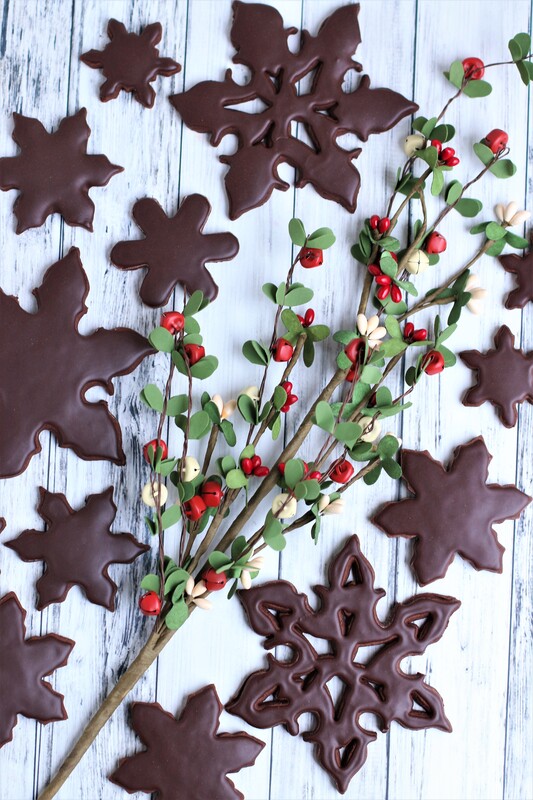
- FROST Pipe or frost completely cooled cookies one at a time, outlining and flooding the cookie with Chocolate Royal Icing.
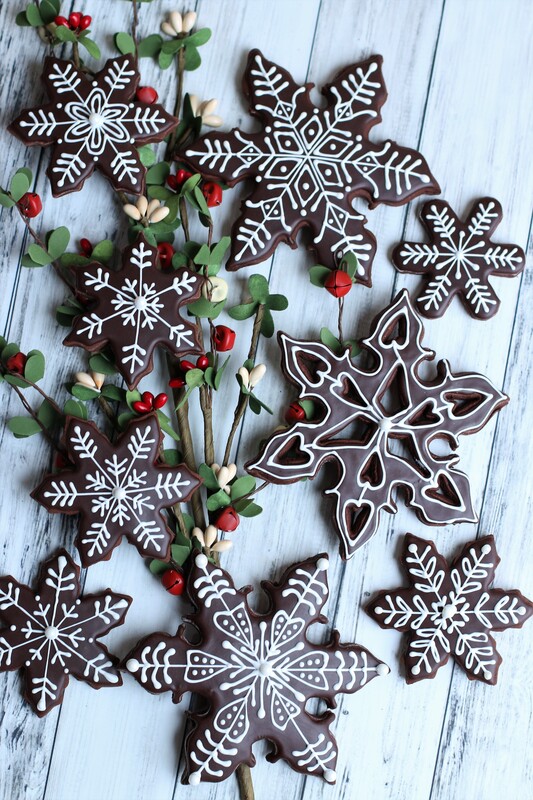
- DECORATE: The next day, add detail by piping Easy Royal Icing snowflake designs - take your time and have fun! And remember, no two snowflakes are alike!
- Allow decorated cookies to set and dry completely before storing – keep parchment paper between each layer or place cookies in individual self-sealing bags for easy freezing and serving.
YIELD: Makes about 27 (three-inch) cookies (or 20 4-inch cookies)
RECIPE NOTES:
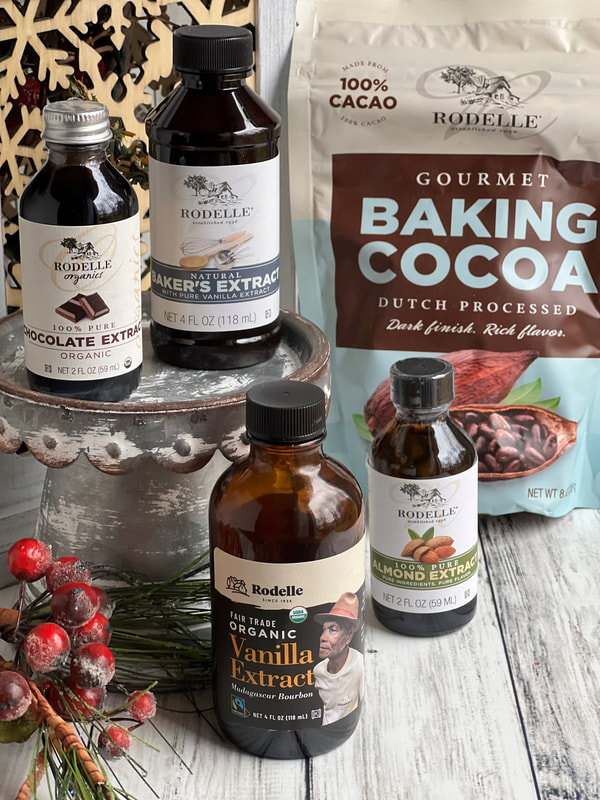
- Rodelle Gourmet Baking Cocoa: For this recipe you can use either Dutch-processed or natural cocoa powder, but Rodelle baking cocoa contains one of the highest levels of cocoa butter on the market, ensuring superior chocolate flavor. For best baking results, Dutch-processed cocoa powder is typically paired with baking powder rather than baking soda. Always use the best quality baking cocoa for the best results!
- Rodelle's Pure Vanilla Extract: My absolute favorite vanilla product - pure vanilla extract produced with highest-quality Bourbon vanilla beans, with a deep, rich and natural flavor.
- Rodelle Baker's Extract: Never used this before? This incredible extract is a blend of Pure Vanilla Extract and other natural flavors such as chocolate, caramel, sweet cream and oak - it adds incredible depth of flavor!
- Rodelle's Organic Chocolate Extract add the flavor of rich chocolate - adding a deep chocolate base flavor and perfect for frostings and icings.
- SIFTING: Sifting the flour and cocoa powder together is imperative to ensure the two are perfectly blended and aerated, and eliminates any lumps!
- SOFT & CHEWY COOKIES: These cookies will stay fresh in an air-tight container at room temperature for up to 3 days or in the refrigerator for up to 1 week.
- FOR THE BEST CHOCOLATE SUGAR COOKIES: I recommend sprinkling cocoa powder on your work surface and rolling pin for rolling out the cookie dough, rather than flour. You may also find it helpful to dip your cookie cutters in cocoa powder between cutting cookies out. Cocoa powder added extra chocolate flavor and chocolate color to these cookies (regular flour may make your cookies bake up with a white surface).
- MAKE AHEAD TIP: Plain baked chocolate sugar cookies freeze well up to 1 month. Thaw overnight in the refrigerator before decorating.
- TO KEEP THESE COOKIES SOFT: Pop some large fresh marshmallows in the container to keep the cookies soft – replace every day or so, as soon as the marshmallows dry out and harden. It’s a sweet little trick! These cookies will stay fresh in an air-tight container at room temperature for up to one week.
- MAKE AHEAD TIP: Plain baked cookies freeze well up to 1 month. Thaw overnight UNOPENED on your kitchen countertop before decorating.
- FOR PARTIES: I package cookies individually in self-sealing clear cellophane cello bags (Pack It Chic are my favorite brand). Make sure cookies are completely dry after decorating before packaging. To make ahead, place individually wrapped and sealed cookies in a larger airtight container and freeze. Thaw on your countertop before serving - do not thaw in refrigerator (you are trying to minimize moisture during defrosting, which can cause your frosting designs to run or bleed).
© SnowflakesandCoffeecakes. All images, attachments & content are copyright protected. All rights reserved. Please do not use my images without prior permission. If you want to republish this recipe, please re-write the recipe in your own words, or link back to www.snowflakesandcoffeecakes.com for the recipe.
NEVER MISS A NEW RECIPE! FOLLOW ME ON
FACEBOOK, INSTAGRAM & PINTEREST!
YOU MAY ALSO LIKE...
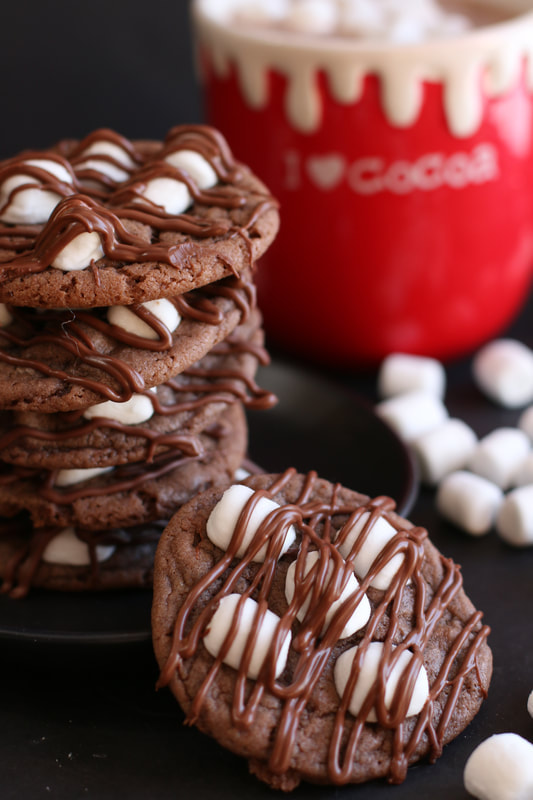
Hot Cocoa Cookies
|
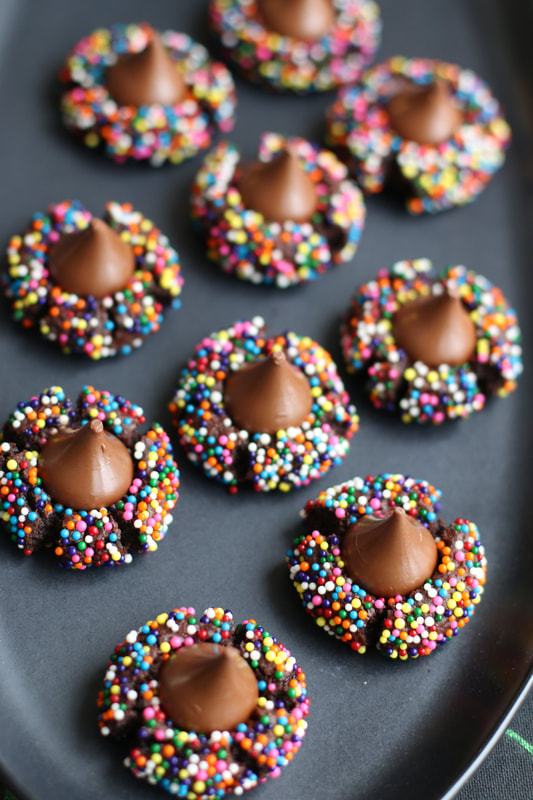
Rainbow Kiss Cookies
|
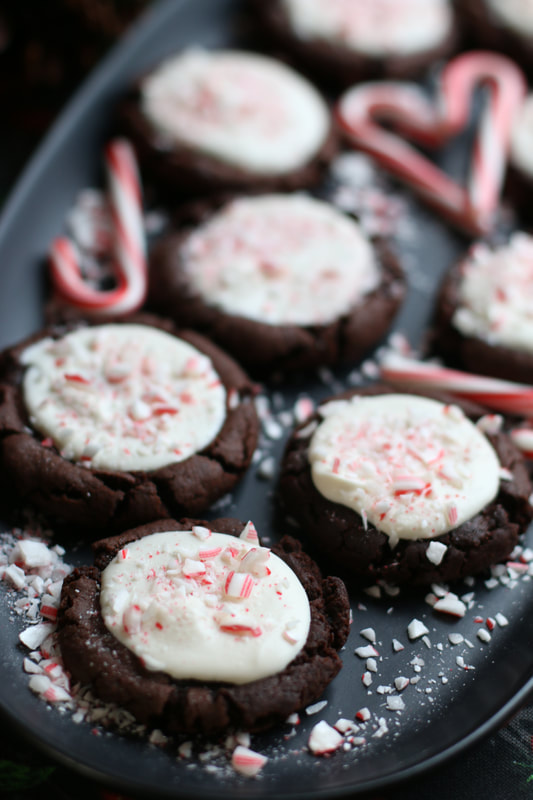
Brownie Candy Cane Cookies
|
LOOKING FOR MORE GREAT HOLIDAY ENTERTAINING RECIPES?
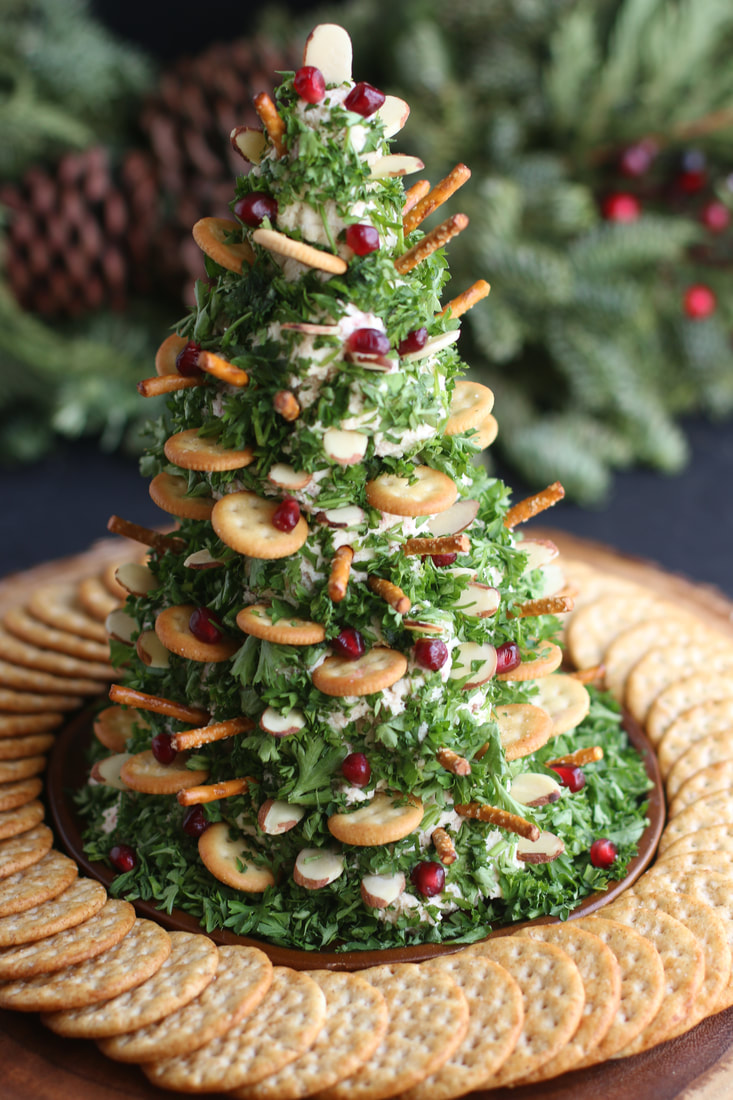
Cheese & Bacon Christmas Tree
|
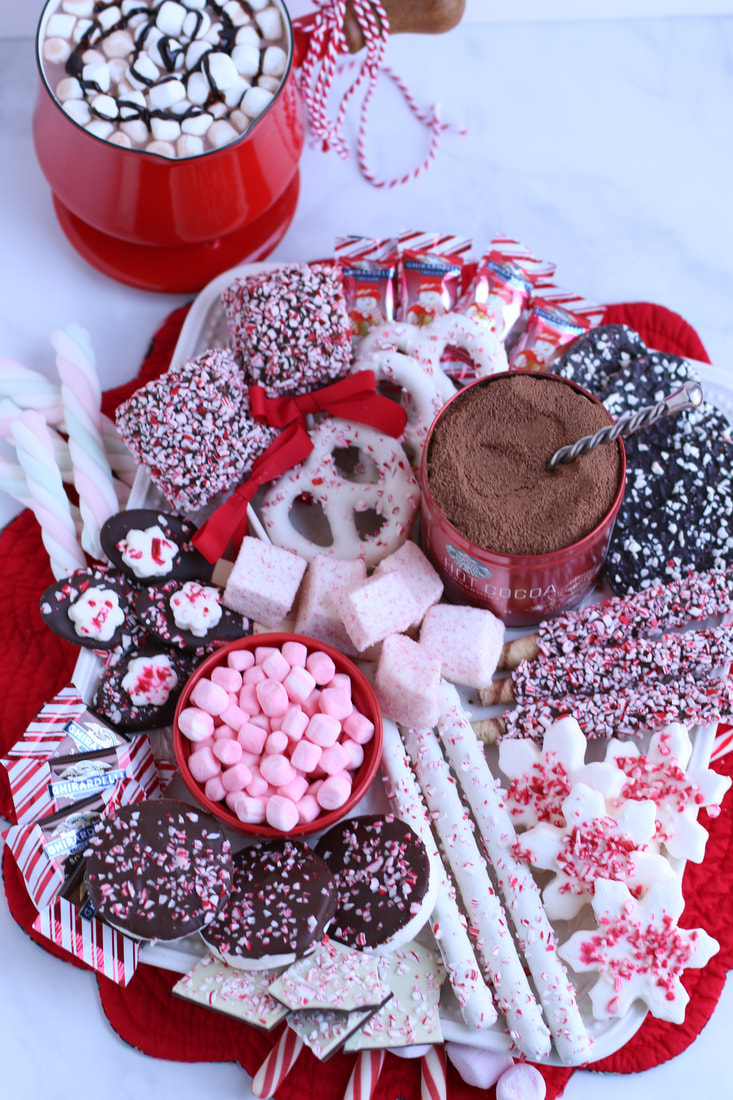
Candy Cane Cocoa Board
|
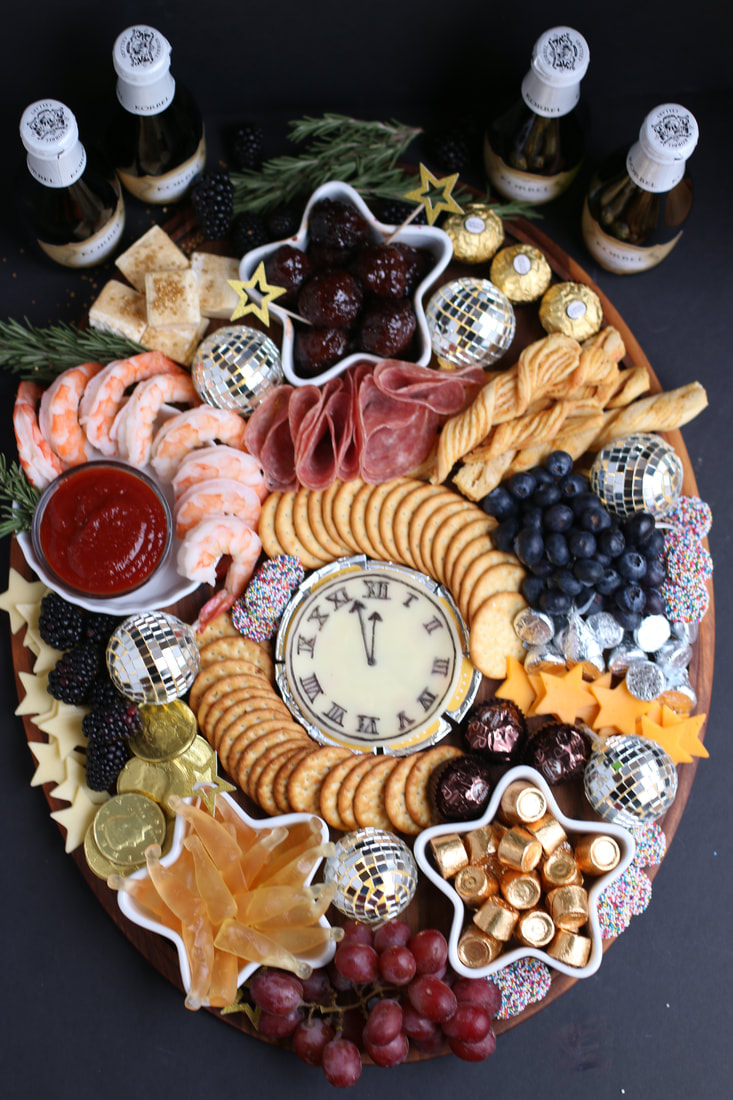
New Year Charcuterie Board
|
TO SEE MORE 2021 HOLIDAY COOKIES FROM MY RODELLE BRAND AMBASSADOR FRIENDS, CLICK BELOW:
 |
Exquisite - as always! I can hardly wait to try these, LOVE your recipes!
These bonnets are a godsend for anyone with long hair. They keep everything contained and tanglefree while I sleep.
Astra77's user-friendly interface makes it easy for players to navigate the site and find their favorite games.
The Occupational Safety card program plays a crucial role in standardizing safety practices across various industries.
The email marketing enables me to send targeted, personalized messages that drive results. The advantages include cost-efficiency, detailed analytics, and the ability to nurture long-term customer relationships. It's an essential strategy for sustainable growth.
This pet nail grinder is a safe and effective way to keep my dog's nails trimmed. It's much gentler than traditional clippers and reduces the risk of cutting too close to the quick. The quiet motor doesn't scare him, making the process stress-free for both of us.
Choosing high-quality hearing aid batteries can significantly enhance the functionality and longevity of your hearing aids, allowing you to enjoy uninterrupted hearing.
Misoprostol's versatility is unmatched. Whether it's addressing stomach ulcers or aiding in pregnancy termination, it's proven to be incredibly reliable.
Dabogaming stands out with its innovative features and top-notch performance. The high-definition graphics and immersive sound effects make every game come to life.
The quality of the materials is top-notch, and the store is always neat and tidy. The staff is friendly and knowledgeable, providing excellent customer service. I appreciate the wide range of sizes available, ensuring that everyone can find something that fits perfectly.
Get a flawless tan at Pearland's top tanning salon.
With its focus on modern aesthetics and quality, this fashion brand delivers exceptional clothing. The versatile pieces are perfect for various occasions, offering both style and comfort.
Leave a Reply.

WELCOME!
You'll find a complete recipe index on the Recipe Collection page or you can use the Recipe Collection dropdown feature to see a visual recipe index by category. If you are looking for something special, the Search function will easily locate your favorite recipe or ingredients. Enjoy - and stop by often!
LOOKING FOR SOMETHING SPECIAL?
LET'S CONNECT!
Never miss a recipe! Please click to follow me on:
 RSS Feed